이미지 업로드 프로토콜
이미지를 업로드하는 방법은 두가지이다.
첫번째는 file upload 버튼을 사용해서 올리게 되는 multi-part 프로토콜 방식이다. 이 때는 브라우저가 해당 프로토콜에 맞게 올려주게 된다. 파일을 업로드하는 메서드는 Post 이다. 그런데 Content-Type이 좀 독특하다.
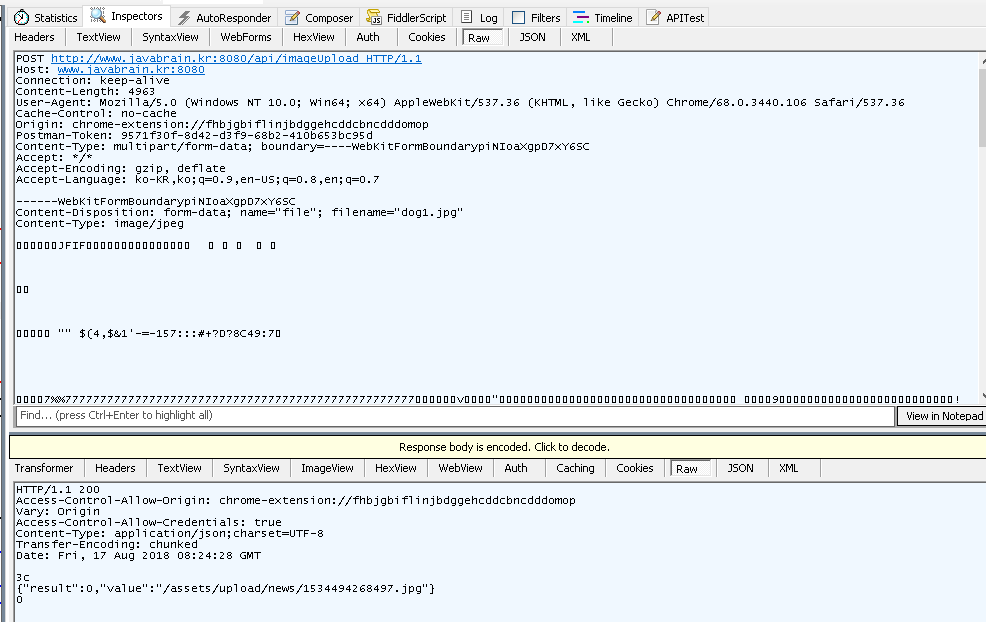
Request할때 헤더를 fiddler를 사용해서 살펴보면, 아래와 같다.
Content-Type: multipart/form-data; boundary=xxxxxxxxxxxxxxxxxxx
body에 보내는 데이터의 content type이 form-data이긴 한데 여러부분으로 나누어 보낸다는 multipart 형태이다. 그리고 각각의 part 사이는 boundary를 이용해서 구분하는데, 앞에 – -를 붙인다. 그리고 맨 마지막에 끝날때는 다시 – -를 붙인다. 예를 들어 3 part를 전송한다고 가정하면 아래와 같이 여래개의 part로 나누어서 보내게 된다.
– -xxxxxxxxxxxxxxxxxxx
Content-Disposition: form-data: name=”value”; filename=”aaa.jpg”
Content-Type: image/jpeg
oooooooooooooooooooooooooooooooooooooooooooooooooooooooo
– -xxxxxxxxxxxxxxxxxxx
Content-Disposition: form-data: name=”value”; filename=”aaa.jpg”
Content-Type: image/jpeg
oooooooooooooooooooooooooooooooooooooooooooooooooooooooo
– -xxxxxxxxxxxxxxxxxxx
Content-Disposition: form-data: name=”value”; filename=”aaa.jpg”
Content-Type: image/jpeg
oooooooooooooooooooooooooooooooooooooooooooooooooooooooo
– -xxxxxxxxxxxxxxxxxxx- –
multi-part 프토토콜을 실페 fiddler로 패킷캡쳐 해보면 다음과 같다.

두번째는 json 방식으로 보내는 방식이다. 이미지는 binary 이므로 json 으로 보내기 위해서는 string 으로 변환해야 한다. RFC2397 data URL scheme 표준 프로토콜을 참고하면 이미지 binary 데이터를 base64로 인코딩해서 보낸다. 이것을 참고해서 변환하면 스트링이 되므로 json으로 서버에 보낼수 있다.
여기서는 첫번재 방법인 file upload 버튼으로 이미지를 업로드시 multi-part 방법으로 구현을 해보겠다.
구현하는 API는 다음과 같다.
- /api/image/upload – multi-part 방식으로 이미지를 업로드하고 DB에 데이터를 저장하는 API
- /api/image/view/{id} – id에 해당하는 이미지 보기 API. xxx.png 를 보기했을때랑 동일하게 동작되도록 한다.
이미지 업로드 및 보기 API 설계
페이지를 리턴하는 페이징 방식에서는 업로드시 한꺼번에 올리고 처리했지만 SPA 에서는 SRP 원칙으로 작게 쪼개는게 확장성에서 유리하다. 이미지 업로드하는 별도의 테이블을 설계를 하고 REST api도 별도로 구축하는것이 확장성이 있다.
서버에서 이미지 binary 데이터를 받은후에 이것을 물리적인 화일로 처리할 지 아니면 DB에 넣어서 처리할 지가 설계를 할 때 맨 처음 고민해야하는 부분이다. file로 처리할 경우는 multi server 일 경우에 처리가 곤란하기 때무에 AWS S3를 사용하는게 가장 방법이다. 이것보다 더 좋은 방법은 DB로 처리하는 방법이다. 여기서도 DB에 저장하고 꺼내오는 방법을 살펴보겠다.
아래 DDL을 실행해서 서버에 image 테이블을 생성한다.
|
1 2 3 4 5 6 7 8 9 |
create table image ( id int auto_increment primary key, mimetype varchar(100) null, data longblob null, original_name varchar(100) null, created timestamp default current_timestamp() null ); |
multi part 이미지 업로드 API 구현
image 테이블과 매핑되는 ImageVO 객체를 domain 패키지에 생성한다.
|
1 2 3 4 5 6 7 8 9 10 11 12 |
package com.eastflag.fullstack.domain; import lombok.Data; @Data public class ImageVO { private Integer id; private String mimetype; private String original_name; private byte[] data; private String created; } |
persistence 패키지에 ImageMapper 를 구현한다.
|
1 2 3 4 5 6 7 8 9 10 11 12 13 14 15 16 17 18 |
package com.eastflag.fullstack.persistence; import com.eastflag.fullstack.domain.ImageVO; import org.apache.ibatis.annotations.Insert; import org.apache.ibatis.annotations.Mapper; import org.apache.ibatis.annotations.Options; import org.apache.ibatis.annotations.Select; @Mapper public interface ImageMapper { @Insert({"<script>", "INSERT INTO image(mimetype, original_name, data)", "VALUES(#{mimetype}, #{original_name}, #{data})", "</script>"}) @Options(useGeneratedKeys = true, keyProperty = "id") int insertBoard(ImageVO imageVO); } |
controller 패키지에 ImageController 를 구현한다.
|
1 2 3 4 5 6 7 8 9 10 11 12 13 14 15 16 17 18 19 20 21 22 23 24 25 26 27 28 29 30 31 32 33 |
package com.eastflag.fullstack.controller; import com.eastflag.fullstack.domain.BoardVO; import com.eastflag.fullstack.domain.ImageVO; import com.eastflag.fullstack.persistence.ImageMapper; import lombok.RequiredArgsConstructor; import org.apache.ibatis.annotations.Select; import org.springframework.http.HttpHeaders; import org.springframework.http.HttpStatus; import org.springframework.http.ResponseEntity; import org.springframework.web.bind.annotation.*; import org.springframework.web.multipart.MultipartFile; import java.io.IOException; @RequiredArgsConstructor @RestController @RequestMapping("/api/image") public class ImageController { private final ImageMapper imageMapper; @PostMapping("/upload") public Integer handleFileUpload(@RequestParam("file") MultipartFile file) throws IOException { ImageVO imageVO = new ImageVO(); imageVO.setMimetype(file.getContentType()); imageVO.setOriginal_name(file.getOriginalFilename()); imageVO.setData(file.getBytes()); imageMapper.insertBoard(imageVO); return imageVO.getId(); } } |
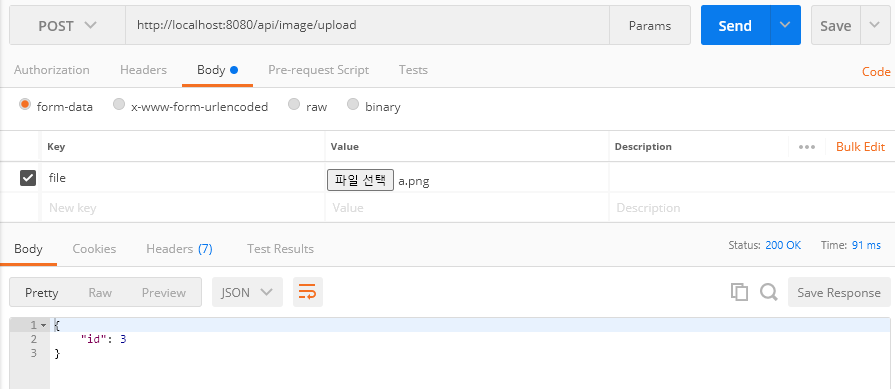
postman으로 테스트해본다.
http://localhost:8080/api/image/upload을 입력하고,
body 부분에서 form-data를 선택하고 key 부분에는 file을 입력하고 파일선택 부분에 이미지하나를 선택한다.
정상적으로 업로드가 완료되면 입력된 id가 보여지게 된다.

이미지 보기 api 구현
브라우저에서 http://xxx.xxx.xx.xxx/a.png 를 하게 되면 브라우저에 이미지가 보이게 된다. 혹은 html 태그에서 <img src=”a.png” /> 하게 되면 이미지게 보이게 된다. 이것과 동일하게 이미지 보기 api를 구현한다.
먼저 mapper를 구현한다.
|
1 2 3 4 5 |
@Select({"<script>", "SELECT * from image", "where id = #{id}", "</script>"}) ImageVO findOneImage(int id); |
controller 에 /image/view/{id} api를 구현한다.
|
1 2 3 4 5 6 7 8 9 10 11 |
@GetMapping("/view/{id}") public ResponseEntity<byte[]> findOne(@PathVariable int id) { ImageVO imageVO = imageMapper.findOneImage(id); HttpHeaders headers = new HttpHeaders(); headers.add("Content-Type", imageVO.getMimetype()); headers.add("Content-Length", String.valueOf(imageVO.getData().length)); return new ResponseEntity<byte[]>(imageVO.getData(), headers, HttpStatus.OK); } </byte[]></byte[]> |
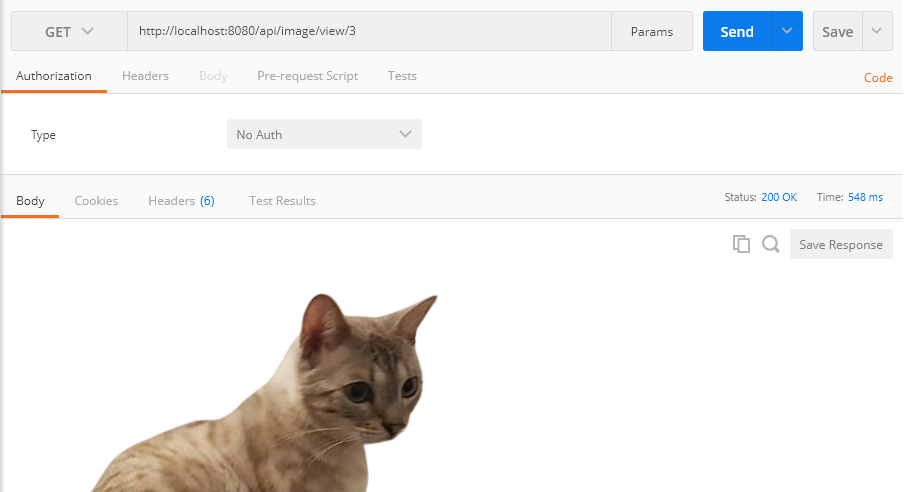
postman으로 테스트해보면 다음과 같다.

