– prerequite
sub menu – 네스티드 라우팅
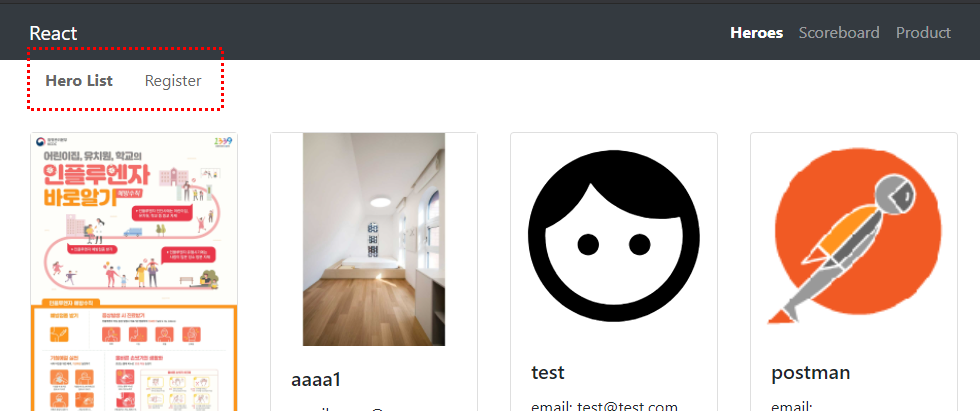
heroes 메뉴 아래에 리스트보기와 등록 페이지를 포함하는 Index 페이지를 만들자. 여기에는 목록보기와 등록페이지 링크를 포함하는 sub menu 를 포함한다.
heroes 페이지폴더 아래에 Register.js 컴포넌트를 추가한다. 이 페이지는 나중에 hero 등록페이지로 만들것이다.
|
1 2 3 4 5 6 7 |
export const Register = (props) => { return ( <div> Register works!! </div> ) } |
목록보기와 등록페이지를 모두 포함하는부모페이지인 Index 페이지를 추가한다. 상단에 메뉴바가 들어가고 바로 아래에 Route가 위치한다.
|
1 2 3 4 5 6 7 8 9 10 11 12 13 14 15 16 17 18 19 20 21 22 23 24 25 |
import React from 'react'; import {NavItem, Nav} from "reactstrap"; import {NavLink, Switch, Route} from "react-router-dom"; import {Heroes} from "./Heroes"; import {Register} from "./Register"; import './Index.scss'; export const Index = (props) => { return ( <> <Nav className="mb-3"> <NavItem> <NavLink to="/heroes/hero" className="nav-link">Hero List</NavLink> </NavItem> <NavItem> <NavLink to="/heroes/register" className="nav-link">Register</NavLink> </NavItem> </Nav> <Switch> <Route path="/heroes/hero" component={Heroes}></Route> <Route path="/heroes/register" component={Register}></Route> </Switch> </> ) } |
위에서 추가된 Index.scss는 아래와 같다.
상단 메뉴에 active 클래스를 선택된 영역으로 진하게하는 scss를 추가한다.
|
1 2 3 4 5 6 7 8 9 |
.nav-link { color: #666666; &:hover{ color: #333333; } &.active { font-weight: bold; } } |
Root.js 에는 /heroes 경로를 Heroes가 아니라 Index로 바꿔줘야 한다.
|
1 2 3 4 5 6 7 8 9 10 11 12 13 14 15 |
export const Root = (props) => { return ( <BrowserRouter> <Menu></Menu> <div className="container" style={{backgroundColor: '#ffffff'}}> <Switch> <Route exact path="/" component={Home}></Route> <Route path="/heroes" component={Index}></Route> <Route path="/scoreboard" component={Scoreboard}></Route> <Route path="/product" component={Product}></Route> </Switch> </div> </BrowserRouter> ) } |
탑 메뉴에서 heroes 메뉴 선택후 sub 메뉴에서 hero list 와 register를 눌러서 active 가 제대로 표시되는지 확인하자.

sub menu active 처리
heroes 메뉴를 클릭시 아래와 같이 현재 아무 화면도 나오지 않는다.

디폴트로 hero list 를 나오게 할려면 어떻게 해야 할까? 만일 NavLink를 /heroes/hero를 /heroes로 바꾸고 Route 패스를 exact path=”heroes” 로 바꾸면 될거 같은데 그러면 어떤 문제가 있는지 살펴보자.
|
1 2 3 4 5 6 7 8 9 10 11 12 13 14 |
<> <Nav className="mb-3"> <NavItem> <NavLink to="/heroes" className="nav-link">Hero List</NavLink> </NavItem> <NavItem> <NavLink to="/heroes/register" className="nav-link">Register</NavLink> </NavItem> </Nav> <Switch> <Route exact path="/heroes" component={Heroes}></Route> <Route path="/heroes/register" component={Register}></Route> </Switch> </> |
테스트해보면 hero list를 진입할때는 문제가 없는데 register로 들어가면 hero list도 같이 active가 되는 현상이 발생한다. 그러므로 이 현상을 수정하기 위해서는 redirect를 사용해야 한다.
|
1 2 3 4 5 6 7 8 9 10 11 12 13 14 15 16 17 18 19 20 21 22 23 24 25 26 |
import React from 'react'; import {NavItem, Nav} from "reactstrap"; import {NavLink, Switch, Route, Redirect} from "react-router-dom"; import {Heroes} from "./Heroes"; import {Register} from "./Register"; import './Index.scss'; export const Index = (props) => { return ( <> <Nav className="mb-3"> <NavItem> <NavLink to="/heroes/hero" className="nav-link">Hero List</NavLink> </NavItem> <NavItem> <NavLink to="/heroes/register" className="nav-link">Register</NavLink> </NavItem> </Nav> <Switch> <Route path="/heroes/hero" component={Heroes}></Route> <Route path="/heroes/register" component={Register}></Route> <Route path="/heroes" render={() => <Redirect to="/heroes/hero" />} /> </Switch> </> ) } |
register 등록 폼 구성
등록화면을 구성한다. bootstrap의 form-group과 form-control을 사용한다.
|
1 2 3 4 5 6 7 8 9 10 11 12 13 14 15 16 17 18 19 20 21 22 23 24 25 26 27 28 29 30 31 32 33 34 35 36 37 38 39 40 41 42 43 44 45 46 47 48 49 50 51 52 53 54 55 56 57 58 59 60 61 62 63 64 65 66 67 68 69 70 71 72 73 74 |
export const Register = (props) => { return ( <> <h3>Hero Registration</h3> <form> <div className="form-group mt-1"> <label htmlFor="name">Name</label> <input type="text" className="form-control" placeholder="Enter Name" id="name" /> </div> <div className="form-group mt-1"> <label htmlFor="email">Email Address</label> <input type="email" className="form-control" placeholder="Enter Email" id="email" /> </div> <div className="d-flex flex-column mt-1"> <div>성별</div> <div> <div className="form-check form-check-inline"> <input className="form-check-input" type="radio" name="sex" value="male" id="male" /> <label className="form-check-label" htmlFor="male">남자</label> </div> <div className="form-check form-check-inline"> <input className="form-check-input" type="radio" name="sex" value="female" id="female" /> <label className="form-check-label" htmlFor="female">여자</label> </div> </div> </div> <div className="form-group mt-1"> <label htmlFor="country">country</label> <select className="form-control" id="country"> <option value="Japan">Japan</option> <option value="American">American</option> <option value="Korean">Korean</option> </select> </div> <div className="form-group mt-1"> <label htmlFor="address">Address</label> <textarea className="form-control" placeholder="Enter address" id="address" rows="3"></textarea> </div> <div className="d-flex flex-column mt-1"> <div>power</div> <div> <div className="form-check form-check-inline"> <input type="checkbox" className="form-check-input" id="flying" /> <label className="form-check-label" htmlFor="flying">flying</label> </div> <div className="form-check form-check-inline"> <input type="checkbox" className="form-check-input" id="penetration" /> <label className="form-check-label" htmlFor="penetration">penetration</label> </div> <div className="form-check form-check-inline"> <input type="checkbox" className="form-check-input" id="hacking" /> <label className="form-check-label" htmlFor="hacking">hacking</label> </div> <div className="form-check form-check-inline"> <input type="checkbox" className="form-check-input" id="strength" /> <label className="form-check-label" htmlFor="strength">strength</label> </div> </div> </div> <div className="m-3 d-flex justify-content-center"> <button type="submit" className="btn btn-outline-primary">등록</button> </div> </form> </> ) } |
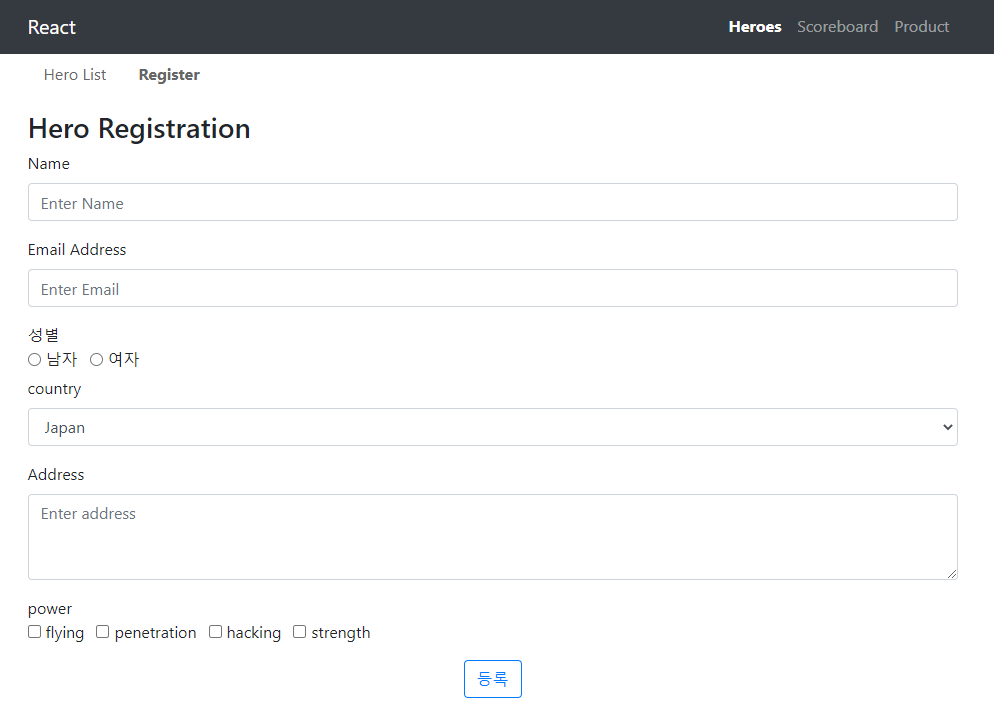
아래와 같은 화면이 된다.

Binding
input, textarea, select box, radio, checkbox 이 다섯가지 html 입력폼 모두를 controlled component로 만들자.
|
1 2 3 4 5 6 7 8 9 10 11 12 13 14 15 16 17 18 19 20 21 22 23 24 25 26 27 28 29 30 31 32 33 34 35 36 37 38 39 40 41 42 43 44 45 46 47 48 49 50 51 52 53 54 55 56 57 58 59 60 61 62 63 64 65 66 67 68 69 70 71 72 73 74 75 76 77 78 79 80 81 82 83 84 85 86 87 88 89 90 91 92 93 94 95 96 97 98 99 100 101 |
export const Register = (props) => { const [name, setName] = useState(''); const [email, setEmail] = useState(''); const [sex, setSex] = useState({ male: false, female: false }); const [country, setCountry] = useState(''); const [address, setAddress] = useState(''); const [powers, setPowers] = useState({ flying: false, penetration: false, hacking: false, strength: false }); const [photo, setPhoto] = useState(''); return ( <> <h3>Hero Registration</h3> <form> <div className="form-group mt-1"> <label htmlFor="name">Name</label> <input type="text" className="form-control" placeholder="Enter Name" id="name" value={name} onChange={(e) => setName(e.target.value)} /> </div> <div className="form-group mt-1"> <label htmlFor="email">Email Address</label> <input type="email" className="form-control" placeholder="Enter Email" id="email" value={email} onChange={(e) => setEmail(e.target.value)} /> </div> <div className="d-flex flex-column mt-1"> <div>성별</div> <div> <div className="form-check form-check-inline"> <input className="form-check-input" type="radio" name="sex" value="male" id="male" checked={sex.male} onChange={(e) => setSex({male: e.target.checked, female: !e.target.checked})} /> <label className="form-check-label" htmlFor="male">남자</label> </div> <div className="form-check form-check-inline"> <input className="form-check-input" type="radio" name="sex" value="female" id="female" checked={sex.female} onChange={(e) => setSex({male: !e.target.checked, female: e.target.checked})} /> <label className="form-check-label" htmlFor="female">여자</label> </div> </div> </div> <div className="form-group mt-1"> <label htmlFor="country">country</label> <select className="form-control" id="country" value={country} onChange={(e)=>setCountry(e.target.value)} > <option value=""></option> <option value="Japan">Japan</option> <option value="American">American</option> <option value="Korean">Korean</option> </select> </div> <div className="form-group mt-1"> <label htmlFor="address">Address</label> <textarea className="form-control" placeholder="Enter address" id="address" rows="3" value={address} onChange={(e)=>setAddress(e.target.value)}></textarea> </div> <div className="d-flex flex-column mt-1"> <div>powers</div> <div> <div className="form-check form-check-inline"> <input type="checkbox" value="flying" className="form-check-input" id="flying" checked={powers.flying} onChange={(e) => setPowers({...powers, flying: e.target.checked})}/> <label className="form-check-label" htmlFor="flying">flying</label> </div> <div className="form-check form-check-inline"> <input type="checkbox" value="penetration" className="form-check-input" id="penetration" checked={powers.penetration} onChange={(e) => setPowers({...powers, penetration: e.target.checked})} /> <label className="form-check-label" htmlFor="penetration">penetration</label> </div> <div className="form-check form-check-inline"> <input type="checkbox" value="hacking" className="form-check-input" id="hacking" checked={powers.hacking} onChange={(e) => setPowers({...powers, hacking: e.target.checked})}/> <label className="form-check-label" htmlFor="hacking">hacking</label> </div> <div className="form-check form-check-inline"> <input type="checkbox" value="strength" className="form-check-input" id="strength" checked={powers.strength} onChange={(e) => setPowers({...powers, strength: e.target.checked})} /> <label className="form-check-label" htmlFor="strength">strength</label> </div> </div> </div> <div className="m-3 d-flex justify-content-center"> <button type="submit" className="btn btn-outline-primary">등록</button> </div> </form> </> ) } |
디버깅 코드 추가
input 박스에 값을 입력하고, 라디오버튼, 체크박스를 클릭하고 셀렉터박스를 선택시 변경된 값이 제대로 바인딩되는지 확인하기 위해서 form 아래쪽에 바인딩 데이터를 확인할 수 있도록 디버깅 코드를 한줄 추가한다.
|
1 2 3 4 5 6 7 8 9 10 11 |
... </form> <p> {JSON.stringify({ name, email, sex, country, address, powers, photo })} </p> </> ) } |
