화면 추가
수정하는 화면은 상세보기화면과 등록화면을 합친것과 유사하다. 먼저 데이터를 가져와서 등록폼에 뿌려줘야하기 때문이다. 따라서 중복코드가 발생하므로 리팩토링의 이슈가 있겠지만 일단은 중복코드가 발생하더라도 기존 코드를 가져와서 활용하도록 하겠다.
board-edit 폴더에 BoardEdit.tsx 컴포넌트를 생성하고 등록폼을 카피해서 붙여넣는다.
|
1 2 3 4 5 6 7 8 9 10 11 12 13 14 15 16 17 18 19 20 21 22 23 24 25 |
const BoardEdit: React.FC = ({match, history}: any) => { const handleSubmit = (event: any) => { } return ( <Form noValidate validated={validated} onSubmit={handleSubmit}> <Form.Group controlId="titleInput"> <Form.Label>제목</Form.Label> <Form.Control required placeholder="" /> <Form.Control.Feedback>Looks good!</Form.Control.Feedback> <Form.Control.Feedback type="invalid">제목을 입력하세요!!</Form.Control.Feedback> </Form.Group> <Form.Group controlId="contentText"> <Form.Label>내용</Form.Label> <Form.Control required as="textarea" rows={20} /> <Form.Control.Feedback>Looks good!</Form.Control.Feedback> <Form.Control.Feedback type="invalid">내용을 입력하세요!!</Form.Control.Feedback> </Form.Group> <Button variant="primary" type="submit"> 저장 </Button> </Form> ); }; |
App.tsx에 라우팅을 추가한다. 이것도 역시 동적 라우팅이여야 한다. /board-edit/:id
|
1 2 3 4 5 6 7 8 9 10 11 12 13 14 |
function App() { return ( <container classname="py-5"> <browserrouter> <switch> <route exact="" path="/" component="{BoardList}"></route> <route path="/board-register" component="{BoardRegister}"></route> <route path="/board-view/:id" component="{BoardView}"></route> <route path="/board-edit/:id" component="{BoardEdit}"></route> </switch> </browserrouter> </container> ); } |
수정할 내용 가져오기
먼저 기존 데이터를 가져와야 한다. 상세보기에서 사용한 REST api를 그대로 사용하겠다. 동적 유알엘에서 파라메터를 파싱하는것도 동일한 로직이다.
|
1 2 3 4 5 6 7 8 9 10 11 12 13 14 15 16 17 18 19 20 21 22 23 24 25 26 27 28 29 30 31 32 33 34 35 36 37 |
const BoardEdit: React.FC = ({match, history}: any) => { const [board, setBoard] = useState<Board>({ title: '', content: '' }); useEffect(() => { console.log(match); getBoard(match.params.id); }, []); const getBoard = async (id: string) => { const res = await axios.get(`/api/board/${id}`); console.log(res.data); setBoard(res.data); } return ( <Form noValidate validated={validated} onSubmit={handleSubmit}> <Form.Group controlId="titleInput"> <Form.Label>제목</Form.Label> <Form.Control required placeholder="" /> <Form.Control.Feedback>Looks good!</Form.Control.Feedback> <Form.Control.Feedback type="invalid">제목을 입력하세요!!</Form.Control.Feedback> </Form.Group> <Form.Group controlId="contentText"> <Form.Label>내용</Form.Label> <Form.Control required as="textarea" rows={20} /> <Form.Control.Feedback>Looks good!</Form.Control.Feedback> <Form.Control.Feedback type="invalid">내용을 입력하세요!!</Form.Control.Feedback> </Form.Group> <Button variant="primary" type="submit"> 저장 </Button> </Form> ); }; |
수정할 내용을 form에 바인딩
게시판의 내용을 가져온 다음에 제목은 제목 input에 내용은 내용 input에 각각 데이터를 바인딩해야 한다. 물론 DOM 방식으로 처리할 수도 있겠지만 리액트의 controlled component 방식으로 처리하겠다. controlled component에 대한 내용은 여기를 참고바란다. controlled form에 대한 이해가 없으면 아래 내용이 이해하기 어려우므로 아래 코딩을 이해하기 위해서는 반드시 선행학습을 해야 한다.
- 게시판의 제목과 내용의 상태 정보를 각각 관리하지 않고 useState 훅으로 객체로 정의한다.
- input form에는 value 에 값을 바인딩하고 onChange 함수를 구현하여 변경시마다 state를 변경시킨다.
|
1 2 3 4 5 6 7 8 9 10 11 12 13 14 15 16 17 18 19 20 21 22 23 24 25 26 27 28 29 30 31 32 33 34 35 36 37 38 39 40 41 42 43 44 45 46 47 48 49 50 |
const BoardEdit: React.FC = ({match, history}: any) => { const [board, setBoard] = useState<Board>({ title: '', content: '' }); const setField = (field: string, value: string) => { setBoard({ ...board, [field]: value }) } useEffect(() => { console.log(match); getBoard(match.params.id); }, []); const getBoard = async (id: string) => { const res = await axios.get(`/api/board/${id}`); console.log(res.data); setBoard(res.data); } const handleSubmit = (event: any) => { } return ( <Form noValidate validated={validated} onSubmit={handleSubmit}> <Form.Group controlId="titleInput"> <Form.Label>제목</Form.Label> <Form.Control required placeholder="" value={board.title} onChange={(e) => setField('title', e.target.value)} /> <Form.Control.Feedback>Looks good!</Form.Control.Feedback> <Form.Control.Feedback type="invalid">제목을 입력하세요!!</Form.Control.Feedback> </Form.Group> <Form.Group controlId="contentText"> <Form.Label>내용</Form.Label> <Form.Control required as="textarea" rows={20} value={board.content} onChange={(e) => setField('content', e.target.value)} /> <Form.Control.Feedback>Looks good!</Form.Control.Feedback> <Form.Control.Feedback type="invalid">내용을 입력하세요!!</Form.Control.Feedback> </Form.Group> <Button variant="primary" type="submit"> 저장 </Button> </Form> ); }; |
수정하는 REST api 호출
validation을 체크하는 부분은 등록할때와 동일하다. 등록대신 수정하는 REST api를 호출한다.
|
1 2 3 4 5 6 7 8 9 10 11 12 13 14 15 16 17 18 19 20 21 22 23 24 25 26 27 28 29 30 31 32 33 34 35 36 37 38 39 40 41 42 43 44 45 46 47 48 49 50 51 52 53 54 55 56 57 58 59 60 61 62 63 64 65 66 67 68 69 70 71 72 73 74 75 76 |
const BoardEdit: React.FC = ({match, history}: any) => { const [validated, setValidated] = useState(false); // 게시판의 제목과 내용을 state로 관리 const [board, setBoard] = useState<Board>({ title: '', content: '' }); const setField = (field: string, value: string) => { setBoard({ ...board, [field]: value }) } useEffect(() => { console.log(match); getBoard(match.params.id); }, []); const getBoard = async (id: string) => { const res = await axios.get(`/api/board/${id}`); console.log(res.data); setBoard(res.data); } const handleSubmit = (event: any) => { event.preventDefault(); event.stopPropagation(); const form = event.currentTarget; if (!form.checkValidity()) { setValidated(false); return; } setValidated(true); // Form.Grou의 controlid는 control의 id를 생성 => form[id] => control 노드 로 접근 console.log(form.titleInput.value); const board = { id: match.params.id, title: form.titleInput.value, content: form.contentText.value } updateBoard(board); }; const updateBoard = async (board: Board) => { const res = await axios.put('/api/board', board); console.log(res); history.push('/'); } return ( <Form noValidate validated={validated} onSubmit={handleSubmit}> <Form.Group controlId="titleInput"> <Form.Label>제목</Form.Label> <Form.Control required placeholder="" value={board.title} onChange={(e) => setField('title', e.target.value)} /> <Form.Control.Feedback>Looks good!</Form.Control.Feedback> <Form.Control.Feedback type="invalid">제목을 입력하세요!!</Form.Control.Feedback> </Form.Group> <Form.Group controlId="contentText"> <Form.Label>내용</Form.Label> <Form.Control required as="textarea" rows={20} value={board.content} onChange={(e) => setField('content', e.target.value)} /> <Form.Control.Feedback>Looks good!</Form.Control.Feedback> <Form.Control.Feedback type="invalid">내용을 입력하세요!!</Form.Control.Feedback> </Form.Group> <Button variant="primary" type="submit"> 저장 </Button> </Form> ); }; |
상세보기 페이지에 수정 버튼 과 돌아가기 버튼 배치
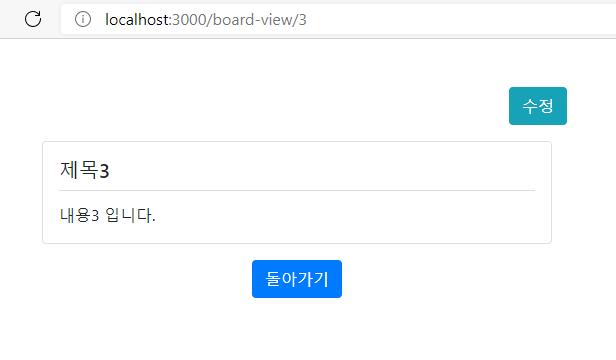
상세보기 페이지 상단에 수정 버튼과 하단에 돌아가기 버튼을 배치한다.
|
1 2 3 4 5 6 7 8 9 10 11 12 13 14 15 16 17 18 19 20 21 22 23 24 25 26 27 28 29 30 31 32 33 34 |
const BoardView = ({match, history}: any) => { const [board, setBoard] = useState<Board>({ title: '', content: '' }); useEffect(() => { console.log(match); getBoard(match.params.id); }, []); const getBoard = async (id: string) => { const res = await axios.get(`/api/board/${id}`); console.log(res.data); setBoard(res.data); } return ( <> <Row className="justify-content-end"> <Button variant="info" onClick={() => history.push(`/board-edit/${match.params.id}`)}>수정</Button> </Row> <Card className="p-3 my-3"> <Card.Title className="pb-2" style={{borderBottom: '1px solid #dddddd'}}>{board?.title}</Card.Title> <Card.Text> {board?.content} </Card.Text> </Card> <Row className="justify-content-center"> <Button variant="primary" onClick={() => history.goBack()}>돌아가기</Button> </Row> </> ); }; |
상세보기에 수정 버튼과 돌아가기 버튼을 추가한 화면이다. 상단 동적 유알엘도 확인하자.

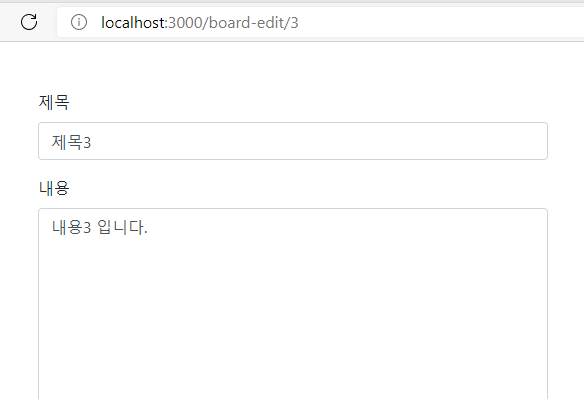
수정화면이다. 상단 동적 유알엘을 파싱해서 게시판 상세보기 REST api를 호출한 다음 데이터를 form에 바인딩하였다.

