라우팅의 필요성 이해
게시판 등록 화면을 구현하기 위해서 App.tsx에 BoardList 컴포넌트를 BoardRegister 컴포넌트로 바꿔치기 했다고 생각해보자. 이렇게 구현한다고 해도 문제가 없어보인다. 그런데, 등록화면에서 사용자가 목록화면으로 돌아가기 위해서 <- 버튼을 눌렀다면 어떻게 될까? localhost:3000 사이트를 이탈하게 될것이다. 왜냐하면 / 라는 유알엘에서 single page로 서비스 하고 있었기 때문이다.
따라서 single page로 구현하더라도 뒤로가기, 즐겨찾기 등 브라우저 히스토리에 저장하기 위해서는 특정 유알엘에 매핑하도록 라우팅을 구현해야 한다.
라우팅 적용
먼저 라우팅 라이브러리를 적용한다. 웹에서 라우팅을 하기 위해서는 react-router-dom을 사용하고 react native 에서는 react-router-native 같은걸 사용한다. @types는 react-router-dom 에 타입스크립트를 지원하기 위해서 래핑한 클래스이다.
|
1 |
npm install react-router-dom @types/react-router-dom |
먼저 화면 등록 클래스를 생성한다. Form 컴포넌트는 react-bootstrap 컴포넌트의 Form 다큐먼트를 참고해야 한다. 여기서 확인하자.
|
1 2 3 4 5 6 7 8 9 10 11 12 13 14 15 16 17 18 19 20 21 22 |
import React from 'react'; import {Button, Form} from "react-bootstrap"; const BoardRegister: React.FC = () => { return ( <Form> <Form.Group controlId="titleInput"> <Form.Label>제목</Form.Label> <Form.Control required type="email" placeholder="" /> </Form.Group> <Form.Group controlId="contentText"> <Form.Label>내용</Form.Label> <Form.Control required as="textarea" rows={20} /> </Form.Group> <Button variant="primary" type="submit"> 저장 </Button> </Form> ); }; export default BoardRegister; |
이제 유알엘별로 라우팅을 구성한다.
- / : 게시판 목록보기
- /board-register : 게시판 등록
|
1 2 3 4 5 6 7 8 9 10 11 12 13 14 15 16 17 18 19 20 21 |
import React from 'react'; import './App.css'; import Container from "react-bootstrap/Container"; import BoardList from "./components/BoardList"; import {BrowserRouter, Switch, Route} from "react-router-dom"; import BoardRegister from './components/BoardRegister'; function App() { return ( <Container className="p-5"> <BrowserRouter> <Switch> <Route exact="" path="/" component="{BoardList}"></Route> <Route path="/add" component="{BoardRegister}"></Route> </Switch> </BrowserRouter> </Container> ); } export default App; |
화면에서 테스트를 해보자. 상단 유알엘에서 /board-register라고 치면 등록화면이 나와야 한다.
목록화면에서 등록 버튼을 추가하고 버튼을 클릭시 /board-register 로 이동하도록 한다. 라우팅에 매핑된 컴포넌트들은 3가지 props를 갖는다. 아래와 같이 콘솔창으로 확인해보면 history, location, match 라는 3가지 props를 부모로 부터 받는다.
|
1 2 3 4 5 6 7 8 9 10 11 12 13 14 15 16 17 18 19 20 21 22 |
const BoardList: React.FC = (props: any) => { console.log(props); ... return ( <> <Row className="mb-3 justify-content-end"> <Col xs="auto" sm="auto"> <Button variant="primary" onClick={() => props.history.push('/add')}>등 록</Button> </Col> </Row> { boardList.map((board: Board)=> <Row className="py-2 board" key={board.id}> <Col>{board.title}</Col> <Col xs="auto" sm="auto">{board.created}</Col> </Row>) } </> ); }; |
이 history props는 객체로서 여러가지 펑션들을 지원해준다.
- goBack() : 뒤로 가기
- go(n) : n번째로 가기
- push(url): url로 이동하기
여기서는 push 펑션을 이용해서 이동하였다.
html5 validation
등록폼을 만들고 html5 validation을 수행한다. yup 이라든가 많은 react validation 라이브러리가 있지만 가장 기본은 html5 validation이다. 만일 html5 validation을 잘 모른다면 여기를 참고하자.
|
1 2 3 4 5 6 7 8 9 10 11 12 13 14 15 16 17 18 19 20 21 22 23 24 25 26 27 28 29 30 31 32 33 34 35 36 |
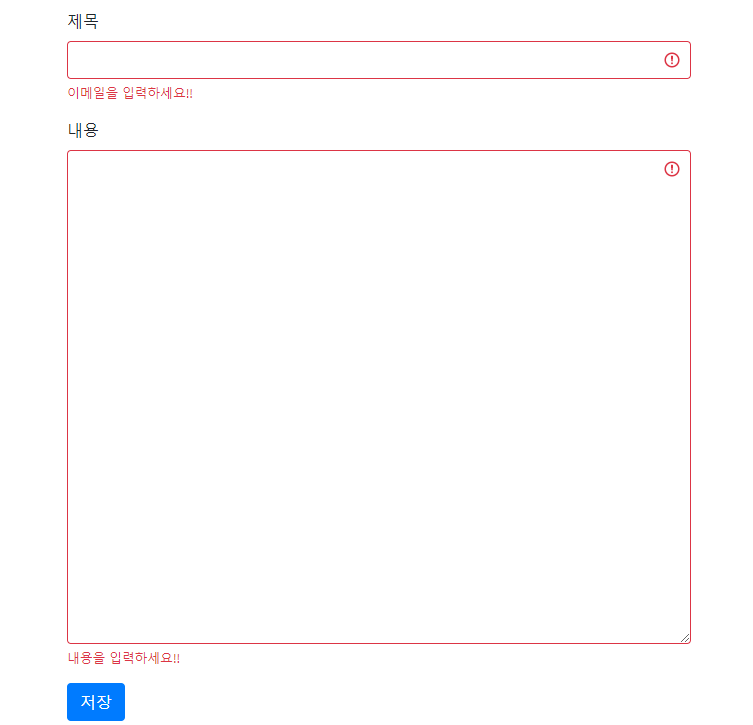
const BoardRegister: React.FC = () => { const [validated, setValidated] = useState(false); const handleSubmit = (event: any) => { event.preventDefault(); event.stopPropagation(); const form = event.currentTarget; if (!form.checkValidity()) { setValidated(false); return; } setValidated(true); }; return ( <Form noValidate validated={validated} onSubmit={handleSubmit}> <Form.Group controlId="titleInput"> <Form.Label>제목</Form.Label> <Form.Control required type="email" placeholder="" /> <Form.Control.Feedback>Looks good!</Form.Control.Feedback> <Form.Control.Feedback type="invalid">이메일을 입력하세요!!</Form.Control.Feedback> </Form.Group> <Form.Group controlId="contentText"> <Form.Label>내용</Form.Label> <Form.Control required as="textarea" rows={20} /> <Form.Control.Feedback>Looks good!</Form.Control.Feedback> <Form.Control.Feedback type="invalid">내용을 입력하세요!!</Form.Control.Feedback> </Form.Group> <Button variant="primary" type="submit"> 저장 </Button> </Form> ); }; |
form은 기본적으로 html5 validation을 하기 때문에 form에 noValidate를 먼저 삽입하여 html5 validation을 하지 않도록 한다. submit 버튼을 누르면 form의 onSubmit 이벤트가 일어나고 handleSubmit에서 form의 유효성을 검증하기 위해서 checkValidity() 함수를 호출한다. 만일 form 이 유효하지 않다면 리턴되고 유효하다면 서버에 등록하는 REST api를 호출한다.
만일 form이 유효하지 않다면 Feedback 컴포넌트의 invalid 타입이 보여지게 되고 valid 하면 type이 없는 속성이 보여지게 된다.

서버 등록 API 호출
controlId는 Control 노드에 id를 생성해준다. DOM API 방식으로 form[id] 로 노드에 접근해서 value를 가져온다.
|
1 2 3 4 5 6 7 8 9 10 11 12 13 14 15 16 17 18 19 20 21 22 23 24 25 26 27 28 29 |
... const handleSubmit = (event: any) => { event.preventDefault(); event.stopPropagation(); const form = event.currentTarget; if (!form.checkValidity()) { setValidated(false); return; } setValidated(true); // Form.Grou의 controlid는 control의 id를 생성 => form[id] => control 노드 로 접근 console.log(form.titleInput.value); const board = { title: form.titleInput.value, content: form.contentText.value } addBoard(board); }; const addBoard = async (board: Board) => { const res = await axios.post('/api/board', board); console.log(res); props.history.push('/'); } ... |
그런데, 등록할때 타입을 Board 타입으로 하면 에러가 발생한다. 왜냐하면 Board에는 5가지 타입이 정의되어있지만 등록할때는 title, content 두개만 필요한데 나머지 3개가 null이기 때문이다.
이럴경우에는 타입명 다음에 ? 연산자인 옵셔널 연산자를 다음과 같이 추가하면 된다.
|
1 2 3 4 5 6 7 |
export interface Board { id?: number; title: string; content: string; created?: string; updated?: string; } |
리팩토링 하기
components 폴더는 공통되는 컴포넌트를 정의하는건데 라우팅이 추가되면서 페이지를 구성하는 페이지들은 pages 폴더에 넣도록 하겠다.
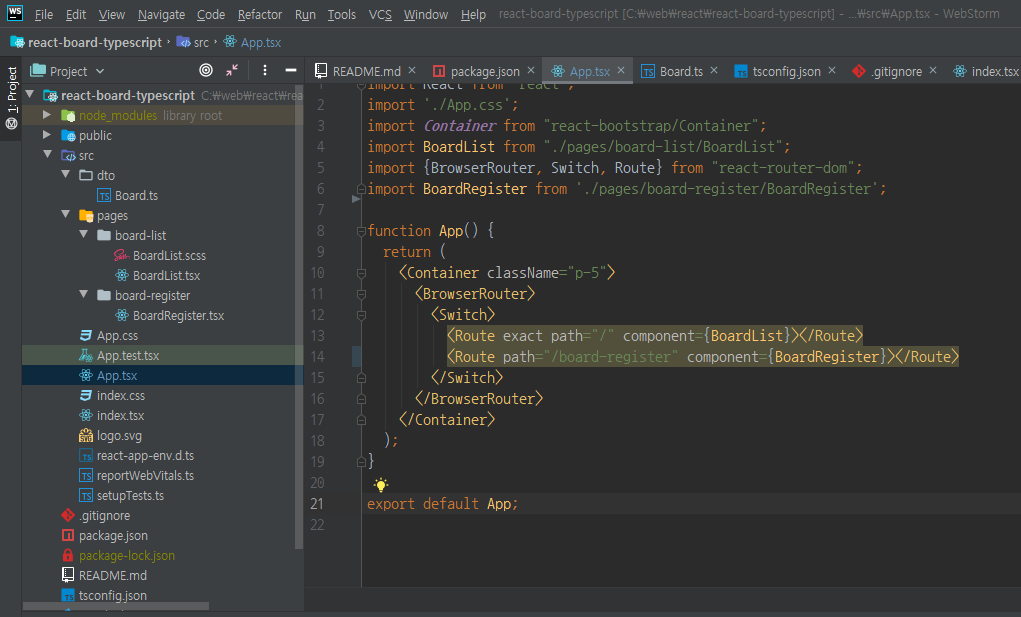
pages 폴더를 추가하고 BoardRegister.tsx 는 board-register 폴더로 옮기고 BoardList.tsx는 board-list 폴더로 옮긴다.
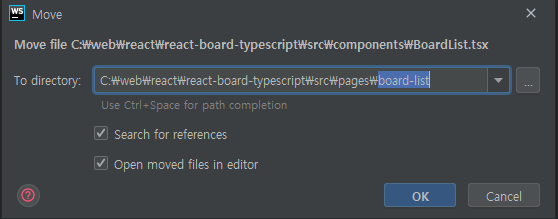
webstorm에서 화일을 선택하고 드랙하게 되면 리팩토링을 할것이냐고 물어보는 창이 뜬다. 화일을 이동하게 되면 해당 화일을 참조하고 있는 파일도 변경이 되어야 하므로 리팩토링에 해당한다. 그래서 하단에 나오는 두개의 체크박스를 모두 체크하고 OK를 눌러야 리팩토링이 일어난다. 만일 체크하지 않으면 리팩토링을 하지 않고 단순히 이동만 일어나게 된다.

이렇게 해서 이동하게 되면 최종적인 폴더 구조는 다음과 같다.

최종 변경된 소스는 다음과 같다.
|
1 2 3 4 5 6 7 8 9 10 11 12 |
function App() { return ( <Container className="p-5"> <BrowserRouter> <Switch> <Route exact="" path="/" component="{BoardList}"></Route> <Route path="/board-register" component="{BoardRegister}"></Route> </Switch> </BrowserRouter> </Container> ); } |
|
1 2 3 4 5 6 7 8 9 10 11 12 13 14 15 16 17 18 19 20 21 22 23 24 25 26 27 28 29 30 31 32 |
const BoardList: React.FC = (props: any) => { // console.log(props); const [boardList, setBoardList] = useState([]); useEffect(() => { getBoardList(); }, []); const getBoardList = async () => { // res는 http response의 header + body를 모두 갖고 있다. const res = await axios.get('/api/boards'); console.log(res); setBoardList(res.data); } return ( <> <Row className="mb-3 justify-content-end"> <Col xs="auto" sm="auto"> <Button variant="primary" onClick={() => props.history.push('/add')}>등 록</Button> </Col> </Row> { boardList.map((board: Board)=> <Row className="py-2 board" key={board.id}> <Col>{board.title}</Col> <Col xs="auto" sm="auto">{board.created}</Col> </Row>) } </> ); }; |
|
1 2 3 4 5 6 7 8 9 10 11 12 13 14 15 16 17 18 19 20 21 22 23 24 25 26 27 28 29 30 31 32 33 34 35 36 37 38 39 40 41 42 43 44 45 46 47 48 49 50 |
const BoardRegister: React.FC = (props: any) => { const [validated, setValidated] = useState(false); const handleSubmit = (event: any) => { event.preventDefault(); event.stopPropagation(); const form = event.currentTarget; if (!form.checkValidity()) { setValidated(false); return; } setValidated(true); // Form.Grou의 controlid는 control의 id를 생성 => form[id] => control 노드 로 접근 console.log(form.titleInput.value); const board = { title: form.titleInput.value, content: form.contentText.value } addBoard(board); props.history.push('/'); }; const addBoard = async (board: Board) => { const res = await axios.post('/api/board', board); console.log(res); } return ( <Form noValidate validated={validated} onSubmit={handleSubmit}> <Form.Group controlId="titleInput"> <Form.Label>제목</Form.Label> <Form.Control required placeholder="" /> <Form.Control.Feedback>Looks good!</Form.Control.Feedback> <Form.Control.Feedback type="invalid">제목을 입력하세요!!</Form.Control.Feedback> </Form.Group> <Form.Group controlId="contentText"> <Form.Label>내용</Form.Label> <Form.Control required as="textarea" rows={20} /> <Form.Control.Feedback>Looks good!</Form.Control.Feedback> <Form.Control.Feedback type="invalid">내용을 입력하세요!!</Form.Control.Feedback> </Form.Group> <Button variant="primary" type="submit"> 저장 </Button> </Form> ); }; |
