먼저 create-react-app 을 이용해서 리액트 사이트를 만든다.
|
1 |
npx create-react-app display |
프로젝트가 만들어지면 개발 의존성을 설치한다.
electron, electron-builder 는 electron을 개발하기 위한 라이브러리이다.
concurrentry는 여러개의 커맨드를 동시에 실행할 수 있게 해준다.
wait-on 은 file, port, http 같은 리소스가 사용가능하게 될 때까지 기다리는 유틸리티이다.
|
1 |
yarn add electron electron-builder concurrently wait-on --dev |
의존성 라이브러리를 설치한다.
NODE_ENV=production 같은 환경 변수는 윈도우 환경에서는 적용되지 않는다. posix에서는 $ENV_VAR 윈도우에서는 %EVN_VAR% 를 사용한다. cross-env는 플랫폼에 의존하지 않고 환경 변수를 하나만 세팅하면 여러개의 플랫폼에 공통으로 적용되도록 해준다.
electron-is-dev 는 개발 및 디버깅시 도움을 주는 라이브러리이다.
|
1 |
yarn add cross-env electron-is-dev |
public 폴더 아래에 electron.js를 만들고 아래의 내용을 넣어준다.
여기를 참고하자.
|
1 2 3 4 5 6 7 8 9 10 11 12 13 14 15 16 17 18 19 20 21 22 23 24 25 26 27 28 29 30 31 32 33 34 35 36 37 38 39 |
const { app, BrowserWindow } = require('electron') const path = require('path'); const isDev = require('electron-is-dev'); function createWindow () { // 브라우저 창을 생성합니다. let win = new BrowserWindow({ width: 800, height: 600, webPreferences: { nodeIntegration: true } }) // and load the index.html of the app. // win.loadFile('index.html') win.loadURL(isDev ? 'http://localhost:3000' : `file://${path.join(__dirname, '../build/index.html')}`) win.on('closed', () => (win = null)); win.webContents.openDevTools(); } // 이 메소드는 Electron의 초기화가 완료되고 // 브라우저 윈도우가 생성될 준비가 되었을때 호출된다. // Some APIs can only be used after this event occurs. app.whenReady().then(createWindow) // Quit when all windows are closed, except on macOS. There, it's common // for applications and their menu bar to stay active until the user quits // explicitly with Cmd + Q. app.on('window-all-closed', () => { if (process.platform !== 'darwin') { app.quit() } }) app.on('activate', () => { // On macOS it's common to re-create a window in the app when the // dock icon is clicked and there are no other windows open. if (BrowserWindow.getAllWindows().length === 0) { createWindow() } }) // 이 파일에는 나머지 앱의 특정 주요 프로세스 코드를 포함시킬 수 있습니다. You can also put them in separate files and require them here. |
package.json에 main 부분과 scripts 부분을 수정한다.
|
1 2 3 4 5 6 7 8 9 10 11 12 13 14 15 16 17 18 19 20 21 22 23 24 25 26 27 28 29 30 31 32 33 34 35 36 37 38 39 40 41 42 43 44 45 46 47 48 49 50 51 52 |
{ "name": "display", "version": "0.1.0", "description": "Menu Display for bar or restaurant", "author": "eastflag", "main": "public/electron.js", "build": { "appId": "display.menu" }, "homepage": "./", "dependencies": { "@testing-library/jest-dom": "^4.2.4", "@testing-library/react": "^9.3.2", "@testing-library/user-event": "^7.1.2", "cross-env": "^7.0.2", "electron-is-dev": "^1.2.0", "react": "^16.13.1", "react-dom": "^16.13.1", "react-scripts": "3.4.3" }, "scripts": { "react-start": "react-scripts start", "react-build": "react-scripts build", "react-test": "react-scripts test", "react-eject": "react-scripts eject", "electron-build": "electron-builder", "build": "npm run react-build && npm run electron-build", "start": "concurrently "cross-env BROWSER=none npm run react-start" "wait-on http://localhost:3000 && electron ."" }, "eslintConfig": { "extends": "react-app" }, "browserslist": { "production": [ ">0.2%", "not dead", "not op_mini all" ], "development": [ "last 1 chrome version", "last 1 firefox version", "last 1 safari version" ] }, "devDependencies": { "concurrently": "^5.3.0", "electron": "^10.1.2", "electron-builder": "^22.8.0", "wait-on": "^5.2.0" } } |
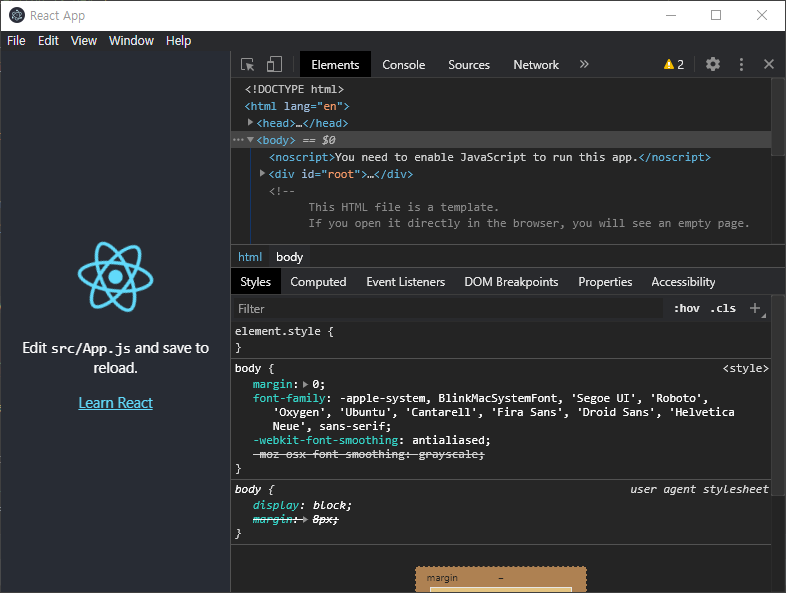
npm run start 로 실행한 화면은 아래와 같다.
실행시에 openDevTools() 코드를 넣어놨기 때문에 디버깅 창이 같이 보인다.

npm run build로 빌드를 해보자.
build 폴더에는 webpack이 빌드한 결과물들이 생기고 dist 폴더에는 display Setup 0.1.0.ext 라는 설치 화일이 생긴다. 더블클릭해서 설치하면 바탕화면에 아이콘이 생기고 이 실행아이콘을 더블 클릭하면 앱이 실행된다.
